-power in
-LAN in, (marked "LAN") and
-LAN out. (marked "To The Camera".)
This page is a "leaf" on a tree with information about remote sensing. It is a leaf of the branch about putting an IP camera (a bit like a webcam, or CCTV) on your LAN, either for local viewing, or, if you want to "open the doors", viewing from afar across the internet.
If you are just getting started with using IP cams, you may want to visit an overview of using IP cams I have provided.
Ad from sponsor, only distantly related to viewing images from afar:
My basic FarWatch system only requires a PC which you are willing to leave running and an internet connection. For about $40 you can add hardware to monitor temperature at the premises. That is just a start. With FarWatch, you can monitor many, many things. And my ArduServer lets you do similar things for even less, if you can "drive" an Arduino.
But! Back to the point of this page: Information about a specific IP cam. (IP cams are like webcams, but they connect to a LAN via TCP as opposed to connecting to a single PC, e.g. via USB). Here you will find information specific to one camera... see my page with more general points about setting up IP cams.
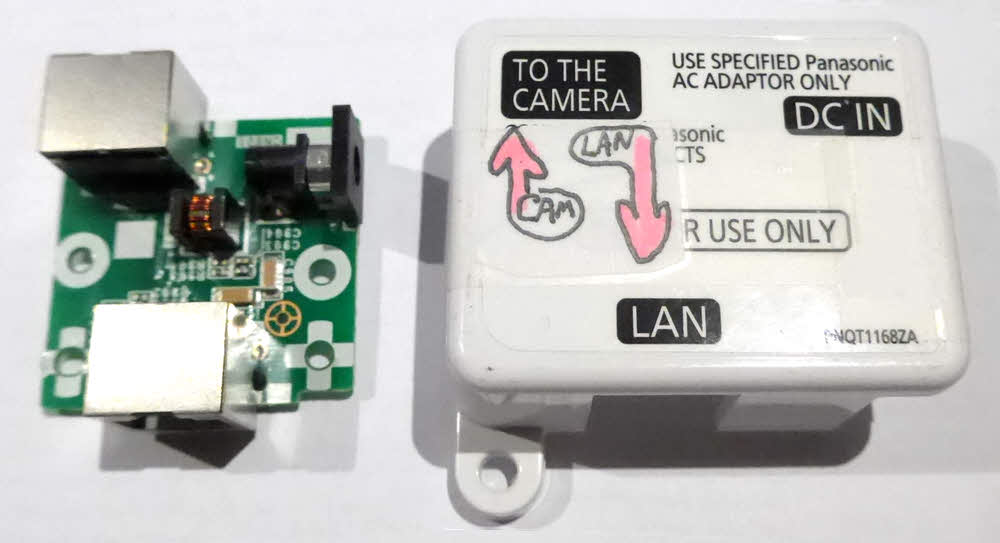
N.B.: The BL-C101E is a" wired only" camera... but the Ethernet (network) cable also brings the camera its power. If you are buying via eBay, be sure your camera comes with the proprietary power injector (a simple block with three sockets:
-power in
-LAN in, (marked "LAN") and
-LAN out. (marked "To The Camera".)
Be sure when connecting to the block that you put the LAN cable into the socket for the LAN cable, and the cable to go to the camera into its socket.... it would be easy to reverse those connections, and probably not good for the items involved.
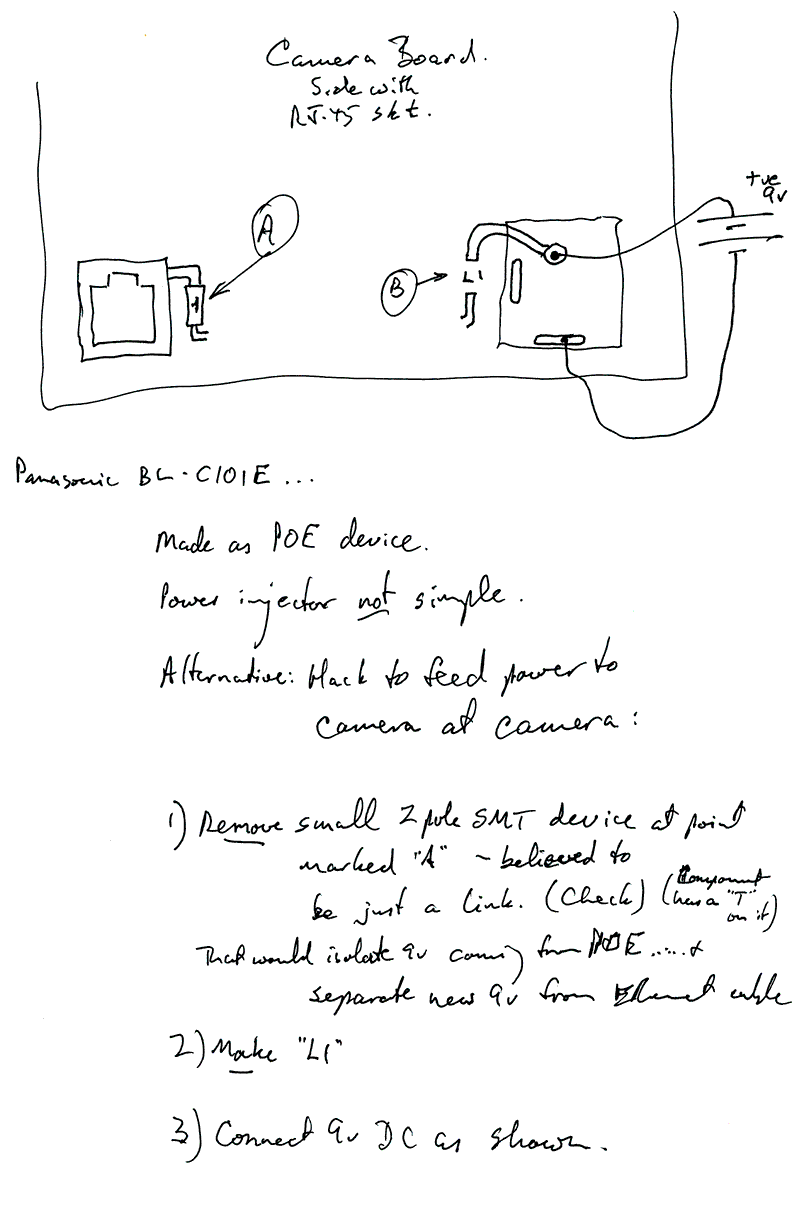
Inside the box: Lots. If you get one of these IpCams without the power injector, you are mostly stuffed. I THINK the adventurous hacker could break one link, make another inside the camera and turn this into an IpCam that is fed its power at the camera, though. Notes at end. THIS "ANSWER" HAS NOT BEEN TESTED!
The BL-C101E is about 9cm square, on it's "face", and about 3cm thick. The one's I've seen are white.
They are sometimes (eBay, etc) described simply as a BL-C101. Which is all that is on the front of them. There is also a BL-C101A, and the BL-C121 has features in common with the other two. In this page, I've tried to speak specifically about the 101E. If you notice mention of things that aren't also true about the -A and 121, do, please, let me know. (Apart from the -E's "usp": POE. (Power over Ethernet).
A quick note about the "digital input" mentioned in the heading: This camera can accept inputs from, for example, a simple "doorbell type" switch. You do not need to... indeed should not... feed a voltage into the digital input, unlike some other cameras which only recognize the input if you do feed a voltage in.
I like the system implemented by Panasonic in this camera for managing what inputs the camera recognizes, and what it does when it sees an input. It can take a picture on a schedule, when it detects motion, or when there's an event on the digital input. And it can FTP it, email it, AND (if you wish, optional) send an email to say it has FTP'd or merely seen an event. In various combinations. The management of the various related settings is the best I, with limited experience, have seen.
The system uses a small table. It seems almost as if you are given a way to set up a selection of "presets", so that you can switch between them according to current wants. I'm not sure how successful the camera would be with implementing some potential combinations of "trigger event/response" settings... but a little common sense will probably stand you in good stead here. Start with something simple, and build that as far as you can, in stages.
The camera does not have an output to turn on external electronics, e.g. a "bell". (I also offer a page on the general considerations of digital inputs and outputs on webcams.)
A manual is, hurrah, available online. It was not, sigh, to me, easy to find or set up in August 2013. Here are the "secrets"...
Go to http://panasonic.net/. Drill down "Consumer", "Home Communication", "Network Camera".
Search on "BL-C101E". Don't be dismayed by the results page. When I did the search, the first result...
Download Contents | Download [CE/E/CN] | Network Camera |
Office Products | Business & Professional
... was, regardless of the unhelpful text, the right one.
That took me to a more usual support page. From there, for the full manual, you want (whether you do or not) the HTML version. But we're not done with warnings and help yet.
As I said, you want the HTML file: "Operating Instructions and Troubleshooting Guide of BL-C101CE/C101E/C121CE/C121E"
After you download that and save it on your disk, you will have a 2 gig .exe file. Run that, and you will, with very little indication of what is going on, get a folder inside your downloads folder called... must have been "obvious" to someone... "om01". Navigate to that, double-click on "index.htm", and you are "in".
CHEEZ! Hasn't Panasonic heard of .pdfs? Or install programs which let you choose where YOU want the install to take place??? (But it is, mostly, a good camera for the price!)
ANYWAY... there IS a manual, with, I imagine, plenty of Good Stuff. I couldn't, at a glance, see anything on the parameters allowed with a snapshot request.
The examples which follow assume that your camera is not using your LAN's DHCP server, but rather has a fixed local address of 192.168.0.254
Much can be done, just using your LAN. Certainly get all LAN based things working before you go on to attempt WAN access. When you are ready for that, the text here assumes that your router has an external, WAN, IP address which is known to the internet generally by means of, say, MyRouter.dyndns.org, by the magic of DDNS, or some other "dynamic directory name server" service.
If you have only one http server on your LAN, it can be at the standard port, 80, and you do not need to explicitly specify it. For the sake of the examples, we will assume that you camera has been put on port 81, so explicitly specifying a port can be illustrated. Just drop the ":81" which appears in many of the lines below if you are using the default port 80... or use ":80"... it will do no harm, and remind you to put the port in, if you go beyond one server. Which you would do if you added another camera, for example.
The Panasonic BL-C101E has an excellent approach to its initial admin user name and password. After you force a reset of the device to the factory defaults, the first time you access it, you are asked to supply an admin user name and password. Other manufacturers please take note!
To force a reset... and you can do this even before you connect the camera to your LAN...
Get power to the camera. The "Power" LED should flash red if you have, as I suggest, left the LED cable to the LAN disconnected from the little box where you connect LAN and power "in", and LAN+ power "out". (The "power injector".)
Press and hold the "Factory Reset" button. The LEDs flashing becomes more rapid for about 6 flashes, then the LED goes dark for about 2 seconds, and then it comes back. Release the factory reset button when the LED comes on again.
NOW you can connect the cable from the power injector to the LAN. The LED is probably doing a slow red flash. (About one cycle per second.) Press and release the factory reset button again. Again waiting for the rapid flashes to stop.
The LED will "do things" for up to 30 seconds, but before 30 seconds are up, should settle on a solid green.
Whew! IPCam and LAN talking to one another... up to a point!
Now it is a case of finding what LAN IP address the camera has been assigned: So far you are only using DHCP. (I'll try to give some help on that elsewhere, elsewhen! q-FIX)
The Panasonic BL-C101E has an EXCELLENT provision, that every web enabled device should have. There is NOT "default" admin user/ password. After you do a factory reset, you have to choose user name and password yourself. Just "go to" the IP cam with your browser, and the relevant dialog will come up.
BL-C101E firmware update:
First catch you rabbit. You need to fetch a file from a reliable source for you camera. Happily, 2/19, Panasonic were still begin good to their old customers.
Google got me to... https://eww.cnw.panasonic.co.jp/security/g/netwkcam/
From there a not- obvious- to- me link (it looked more like a section heading than a link) took me to a page to select region, and from there I found that the "latest/ greatest" file appeared (2/19) to be "c101ce_v360R00ce.bin, to give me vers.3.60R00. (The "ce" being for compliance with European standards, I think. (I'd gone down a path for BL-C101 cameras... it seems the software's the same for the "E" and "A" versions. Hope so, anyway! (Note to self (I have several of these to re-flash: The file is on pcVash)
Fetched the .bin file. Saved it on my hard disk.
Now with camera, via web browser, from camera's main page (probably the "single camera" one, for most people), click on the "Maintenance" tab.
Umm. Ah. When I was doing this, during an update for this webpage, 2/19, I encountered one or two unexplained "camera will now be reset" events. Maybe I clicked the wrong thing... but I don't think so. You just have to be patient, wait out the restart progress. At least it leaves you still connected.
Eventually, you get to the "update firmware" page. "Drill down" to the .bin file you fetched from Panasonic, and say (words to effect) "Go". DO NOT DISTURB IT during the update process. (You can find yourself halfway across the river, with the bridge behind you burned, and no bridge ahead of you. sound scary? It is. But necessary. I've done many updates, respected the "do not disturb it", and come out the other side okay.
Once the reset is over, you may get a "page not found". Just access the device again, using the LAN IP address you used before. All should be well. Or go back further, unplug it from LAN. Wait 10 seconds, re-connect it, figure out what IP address it is on, log in as you did before. You should need to do a factory reset.
I would probably put it on a static IP address at this point, and perhaps have it serve web pages on a non-standard port. These steps aren't "essential"... if you have one camera, and/or only want to use it on your LAN. (Someday I'll write a page about these issues for you.)
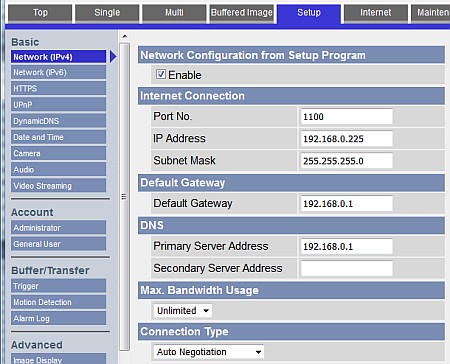
For the Panasonic BL-C101, "Setup"/ Network IP4 is where you do these things. the image shows you what I did to put the camera on port 1100, LAN IP 192.168.0.225. Not that the DNS server's IP address should be your router's LAN IP address... it is often the one shown.
By the way: Those aren't the port and IP address numbers I use. Don't tell people that data.
After you change the camera over to a static IP address, and a different port, you will have to "reconnect" to it. (If you made the settings shown above, you would put the following into your browser...
192.168.0.225:1100
If your browser doesn't like that, try putting http:// in front of it.
If you will be using a numerically designated NTP server, I don't think you need the next thing. But if you are using, say, MrNiceGuy.Somewhere.ac for your NTP server, the camera will need to access a DNS server. So now we move on to how you can use an NTP server to get the time of day.
-->I then tried to set the camera to fetch the time of day from an NTP server. For that, you use "Setup", and from the "Basic" section go to "Date and Time".
I kept getting "Failed to save Failed to connect to NTP Server. Please check NTP Server Address or Hostname."
I was trying to send the camera to http://130.88.200.4, which I'm pretty sure I am currently using with other cameras (2/19). Going there with my browser returns a page saying "It works".
Sigh. I had to struggle with this more than I recall having to struggle in the past. Eventually, the following worked...
1.uk.pool.ntp.org
(no "http://" needed, apparently)
The good news is, that when you try to save the Date/Time settings page, after indicating what server you will use, and ticking the "enable" box, the camera tries to access the NTP server. And tells you if it fails. Note the time your camera THINKS it is BEFORE you do the NTP server set-up. Make it wrong by 15 minutes or so, "by hand", if it is right at the moment. As soon as the camera comes back after you do a successful save of the NTP configuration, you should see the right time on the Date/Time page.
ALL OF WHICH was in aid of putting datestamps on images from the camera...
Go to Setup/ Advanced- Image Display... and then down to the Overlay setting. Don't worry, as you set the date format... you WILL get the time, as well.
Save settings. Then go to basic single camera view: You should see the datestamp on the image. Hurrah!
To fetch a "snapshot" from the Panasonic BL-C101E, the "magic code" MAY be what follows. This is not an easy subject!
In the following, you will see "usr:pw@". This is a way to pass a user ID and password to the camera while accessing it. (You have to replace the usr with a user ID the camera knows, and replace pw with the password for that user. THIS IS A VERY INSECURE METHOD! You might as well list the user name and password on a webpage. Be sure ONLY to use a very limited "see the image only" user for this purpose. And only use it with a camera which does not monitor anything sensitive.
http://usr:pw@192.168.0.254:81/SnapshotJPEG?Resolution=640x480&Quality=Standard
or
http://usr:pw@MyRouter.DynDns.org:81/SnapshotJPEG?Resolution=640x480&Quality=Standard
... the first being the code you use if you are on the same LAN as the camera, the second being the code to access from afar, over the internet. (The second will also work "across" the LAN, but you will be "going around the houses".) (I won't be repeating the two variations after this, you have to remember they are there, use them as needed. The ":81" can be left out if you are using the standard port 80 for your IP cam, as discussed earlier.
The settings "640x480" and "Clarity" are not, of course, the only possibilities. If you know where there's a good list of all the options, I would be grateful if I heard from you.
N.B. Some specifics regarding using the above with a Panasonic BL-C101E, specifics which may give you hints about overcoming similar issues in other cameras.
To view a snapshot from the IP cam on a given computer, either that computer must have been "authorized" to call for snapshots, or, you must first have changed one of the default setting in the camera. We will discuss both.
If the camera is in its factory default state, or mostly so apart from an admin user having been set up, then you will not be able to change settings or access a snapshot from the camera (via the simple URL-in-browser route) without supplying your credentials. Without authorizing yourself by means of saying which user-known-to-the-camera you are, and supplying the relevant password.
Sounds good. Sadly, even after you tweak the camera's state, the authorization scheme is pretty simple minded.
If you have logged on to the camera previously, and not closed the browser used in the meantime, you will still be logged on. The authorization does not time out. (This can lead to confusion when you are testing some of the tweaks I will explain.) If you close the browser, that MAY be enough to de-authenticate you. (Just closing the tab you accessed the camera through will not be enough.
But! There are all sorts of Good Things you can do.
Log into the settings interface for the camera.
Go to Account/ General User.
Click on GuestUser in list, then click "Modify"
Tick at least the box for "Capture Image Button", even
    though you may not be interested in using the BUTTON.
    (You MAY also need to tick the box for "View
       Buffered Image page".... try doing all this
       without ticking that second box, let me know
       if the first alone is enough?)

   .... AND click the SAVE button at the bottom
   of the page.
Now, without further ado (no need to restart anything), the snapshot URL should work from a "foreign" machine, i.e. one not previously authorized to access snapshots. There is no need to pass "GuestUser" to the camera in the snapshot command.
(The "GuestUser" account is always present, and, I presume, used (as tweaked by you) by default for serving users who are not logged on.)
You can also set up other users, with their own user ID and selected- by- you sets of privileges.
So... that's how you set the camera up to allow users to request a snapshot with a browser. If you have the camera on a LAN, the following little "webpage", saved as a file of type .htm, on any computer in the LAN "should" allow the computer's user to "watch" the camera, with a new snapshot every 15 seconds. (Beware the implications for traffic on your LAN.)...
<head>
<meta http-equiv="refresh" content="15">
</head>
<body>
<img src="http://usr:pw@192.168.0.254:81/SnapshotJPEG?Resolution=640x480&Quality=Standard">
</body>
Again... the "usr" and "pw" need replacing. (See above), and this method of logging on is VERY INSECURE.
In the preface I spoke about the "fact" that it is hard to do without the power injector. (Panasonic part number PNQT1168ZA... if you'll sell me one for $12/ £15 to include shipping to US or UK, please get in touch!)
THE FOLLOWING IS NOT TESTED. TRY IT AND YOU MAY DAMAGE CAMERA OR THINGS ON YOUR LAN. Any damage, etc, from what YOU DO is down to YOU. (But I will try it with one of mine one day...)
![]() Page has been tested for compliance with INDUSTRY (not MS-only) standards, using the free, publicly accessible validator at validator.w3.org. Mostly passes.
Page has been tested for compliance with INDUSTRY (not MS-only) standards, using the free, publicly accessible validator at validator.w3.org. Mostly passes.
AND passes...
